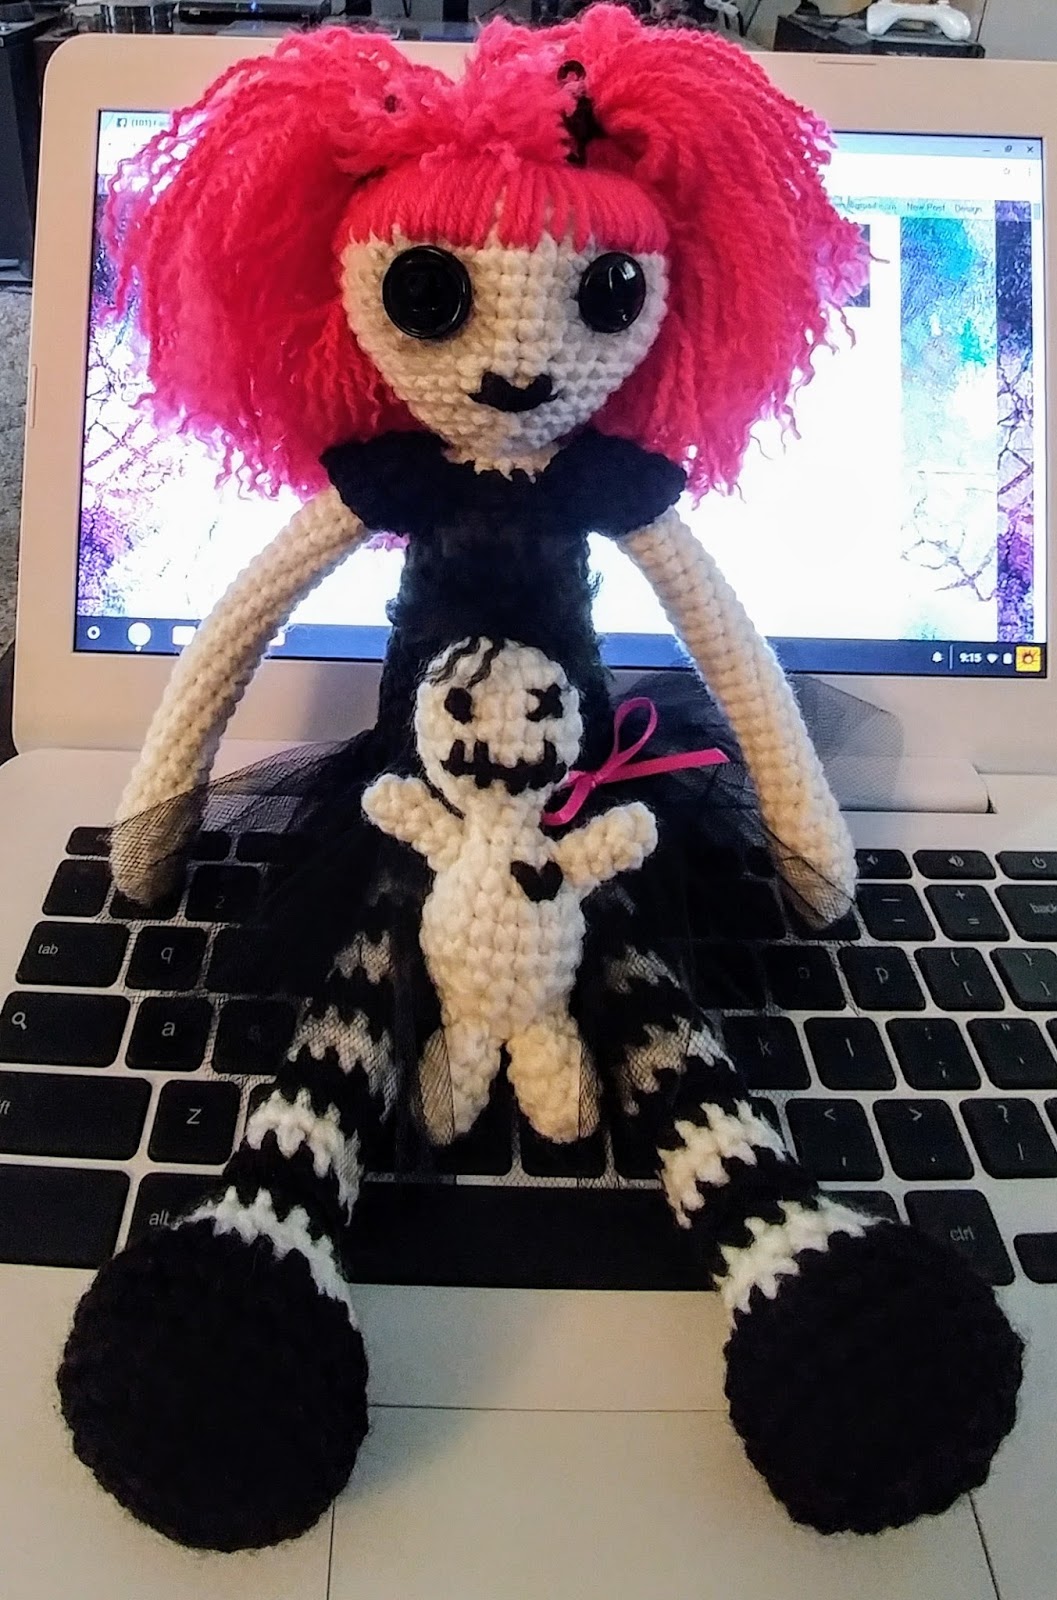
Goth Doll with Voodoo Baby
Howdy! I finally got around to making a new body for non-Moppet dolls...
 There are so many options here that I'm going to focus first just on the doll because from here you can go ANYWHERE... :D (don't believe me? solid color legs... red and white legs and white body for Raggedy Ann? Harley Quinn? Tattered Zombie?)
There are 2 patterns here, because of the little voodoo baby
 What you'll need:
4mm crochet hook (larger will make bigger dolls, smaller will make smaller dolls)
Worsted weight yarn in 3 colors, 4 if you're striping the legs differently from the rest of the body
A darning or yarn needle
Scissors
Stuffed animal stuffing or yarn ends or both (I use both)
A stitch marker or strand of yarn to use as a stitch marker in a color other than what you're working with
Abbreviations
ch = Chain
BLO = Back Loop Only (usually you crochet through both loops of the stitch below where you are working, in this case you pick up only the back half of the V and leave the front one unworked, it causes the work to fold more neatly on this row so that the decreases form the bottom of a cup instead of a shrinking dome)
f/o = Finish Off (I do this by slip stitching into the next stitch, cutting the working yarn and pulling the end through the loop)
m/c = Magic Circle
sc = Single Crochet
inc = Single Crochet Increase
dec = Single Crochet Decrease
sl = slip stitch (this is the stitch I use to finish off)
(#) = Number of stitches in the row

 Goth Doll
Arms (make 2)
I used Cloud (off-white) yarn.
Stuff every 4 or 5 rows as you go, stuff the hand more firmly and then more loosely through the arm
Round 1: 6 sc in m/c and pull tight, tie off after Round 2 (6)
Round 2: 2 sc + inc, repeat 2 times (8)
Round 3: 3 sc + inc, repeat 2 times (10)
Rounds 4-5: sc around (10)
Round 6: 3 sc + dec, repeat 2 times (8)
Rounds 7-30: sc around and f/o on final Round leaving long tail for sewing (8)
flatten arm and sew two sides together - do not cut yarn, you need it for attaching to the body
Legs (make 2)
I used Black to start the shoes and then after the first time I changed to white I worked 2 rows in each color before switching and left the working yarn uncut between color changes (just pull it up behind on the inside of the leg as you go)
Stuff every 4 or 5 rows as you go, stuff foot and "shoe" firmly and more loosely through the leg
Round 1: 6 sc in m/c and pull tight, tie off after Round 2 (6)
Round 2: inc in each stitch around (12)
Round 3: sc + inc, repeat around (18)
Round 4: 2 sc + inc, repeat around (24)
Round 5: sc BLO around (24)
Rounds 6-7: sc around (24)
Round 8: Change Color every 2 rows, carrying yarn up between color changes 2 sc + dec, repeat around (18)
Round 9: sc + dec, repeat around (12)
Round 10: Change Color sc, dec, 9 sc (11)
Round 11: sc, dec, 7 sc (10)
Rounds 12-30: Change Color sc around (10)
from here on out Change Color every 2 rows, continuing to carry yarn up between color changes
f/o after final Round leaving long tail for sewing
flatten leg and sew two sides together - do not cut yarn, you need it for attaching to the body
Sleeve Caps (make 2)
I used Black yarn
Leave a long tail at the start and at the finish for attaching to body
Round 1: ch 9 and work your way back along the stitches in sc, ch 1 and turn (8)
Round 2: 2 sc, inc, 2 sc, inc, 2 sc, ch 1 and turn (10)
Round 3: sc across, ch 1 and turn
Round 4: ch 1, sc and then ch 1 in each stitch across to the last stitch where you f/o and leave a long tail
Head and Body
Round 1: 6 sc in m/c and pull tight. Tie in after Round 2. (6)
Round 2: inc in each around (12)
Round 3: sc + inc around (18)
Round 4: 2 sc + inc around (24)
Round 5: 3 sc + inc around (30)
Round 6: 4 sc + inc around (36)
Round 7: 5 sc + inc around (42)
Rounds 8-12: sc around (42)
Round 13: 5 sc + dec around (36)
Round 14: 4 sc + dec around (30)
Rounds 15-16: sc around (30)
Round 17: 3 sc + dec around (24)
Begin stuffing head firmly, its about to get hard to do.
Round 18: 2 sc + dec around (18)
Round 19: sc + dec around (12)
Add a little more stuffing to head, from here on out its almost impossible without a tool.
Round 20: dec around (6)
Round 21: sc around (6)
Round 22: inc around (12)
Round 23: Change Color. sc + inc around (18)
Round 24: 2 sc + inc around (24)
Rounds 25-31: sc around (24)
Add stuffing to neck and up into head as much as possible to firm up the shoulders and neck.
Round 32: 3 sc + inc around (30)
Rounds 33-35: sc around (30)
Round 36: 4 sc + inc around (36)
Rounds 37-38: sc around (36)
Round 39: BLO 4 sc + dec around (30)
Round 40: 3 sc + dec around (24)
Stuff body fairly firmly here... you can squeeze a little more in later, but this is the best time. Also, reinforce the fold of your BLO row by holding it as you stuff up to it from inside the doll, trying to keep her bum flat but not concave.
Round 41: 2 sc + dec around (18)
Round 42: sc + dec around (12)
Round 43: dec in all around (6)
f/o and use tail to sew bottom closed - feed into body and cut to hide string
Assembly
Begin by choosing your front and back... all of our increases and decreases have moved the color jogs around the body. Choose the best spots. I hide the color change between neck and body under one of the arms.
Arms
Attach at the line of the shoulder where the color changed.
Sleeve Caps
Attach at the tops of the arms and stitch down the sides of the rows into the body under the arm at front and back, knot in a stitch and hide ends by stitching into body and cutting the yarn ends.
Legs
Attach to the front of the body in the stitches between rows 41 and 42. Knot and hide ends in body.


 Voodoo Baby
I used all Cloud for the body and arms and legs and Black for the embellishment.
Arms (make 2)
Round 1: sc 4 in m/c and pull tight (4)
Rounds 2-4: sc around (4)
f/o and leave long tail for sewing to body - don't bother to flatten
Legs (make 2)
Round 1: sc 6 in m/c and pull tight (6)
Rounds 2-4: sc around (6)
f/o and leave long tail for sewing to body - don't bother to flatten
Head and Body (I barely stuff this, but I do add a little stuffing as I work along)
Round 1: 6 sc in m/c and tighten - sew in after Round 2 (6)
Round 2: inc in each stitch around (12)
Round 3: sc + inc, repeat around (18)
Rounds 4-6: sc around (18)
Round 7: sc, dec and repeat around (12)
Add any stuffing you were going to add to head now.
Round 8: dec around (6)
Round 9: sc around (6)
Round 10: 2 sc + inc, repeat x2 (8)
Round 11: sc, inc x4 (12)
Round 12: sc around (12)
Round 13: sc + inc around (18)
Rounds 14-15: sc around (18)
Round 16: sc + dec around (12)
Add any stuffing you were going to add to body now.
Round 17: sc around (12)
Round 18: dec around (6)
f/o and sew closed, hide yarn end in body
Assembly and "embellishment"
Sew arms at the bottom of the row where neck joins body. Hide yarn ends in body.
Sew legs at the bottom using the Round 18 dec to mark the middle alignment. Hide yarn ends in body.
I cut about 12" of black yarn and knotted one end over and over to make a little ball and used it as one eye and then stitched the x and the mouth with the rest of the yarn, ending in the body with a repeated V to make a heart and hiding the yarn end in the body.
I cut shorter lengths of yarn and stitched them into the top ring of the head and knotted them around then used a comb to separate the strands and make them fluffy, then trimmed to shape with scissors.
 Goth Doll Dress Up
What You'll Need (if you're doing what I did)
A regular hair comb
16-20" of ribbon
Black tulle, 3" wide
2 black buttons 3/4" diameter
q-tips
black ink pad or eye shadow
worsted weight yarn for hair
darning or yarn needle
scissors
This is where you really give this gal some personality. Is she a Raggedy Ann doll with pretty red curls? Is she a punky Raggedy Ann with messier curly red pig tails or wild fluffy untamed hair? Is she full on goth or spooky or just cute and sweet?
 I darkened the rings around my girl's button eyes with black stamping ink on a q-tip before I attached her eyes because I didn't want a plain white circle under the buttons. I smudged it a bit with a plain cotton ball after the eyes were in place.
I affixed her skirt permanently because this is an art doll, not a child's toy and so she won't be changing clothes often.

 Using a 16" long piece of narrow satin ribbon fed through a darning needle I sewed back and forth through the stitches in row 36 or 37 making myself a foundation for the tulle to attach to. I wanted the bow at her hip so that's where I started and finished and then knotted before making the bow.

 Then I cut 6" lengths of 3" wide black tulle in equal number to the showing colored stitches around the doll's body. Inserting a 3.5mm crochet hook in the colored ribbon loop from bottom to top I captured a piece of tulle in the hook and pulled it down through the ribbon until the loose ends of the tulle would fit through the loop and then pulled them through in a knot all the way around.
 I started by stitching her bangs in place before I started tying in her hair. You can actually stitch around the entire hairline if you choose to, like a border. I don't prefer this look.

Next I cut 10" and 6" lengths of Fair Isle Liberty yarn in Geranium for my doll's hair and fluffed it with a comb before securing it in bits of ribbon because I wanted her hair to be wild and free - more like Helena Bonham Carter and less traditional Alice in Wonderland. :D (this takes LOTS of yarn... don't be frugal... let it be full and make sure the entire hairline is covered when making ponytails, even if you matched the scalp to the hair color because you're that fastidious.)

There are 2 patterns here, because of the little voodoo baby

4mm crochet hook (larger will make bigger dolls, smaller will make smaller dolls)
Worsted weight yarn in 3 colors, 4 if you're striping the legs differently from the rest of the body
A darning or yarn needle
Scissors
Stuffed animal stuffing or yarn ends or both (I use both)
A stitch marker or strand of yarn to use as a stitch marker in a color other than what you're working with
Abbreviations
ch = Chain
BLO = Back Loop Only (usually you crochet through both loops of the stitch below where you are working, in this case you pick up only the back half of the V and leave the front one unworked, it causes the work to fold more neatly on this row so that the decreases form the bottom of a cup instead of a shrinking dome)
f/o = Finish Off (I do this by slip stitching into the next stitch, cutting the working yarn and pulling the end through the loop)
m/c = Magic Circle
sc = Single Crochet
inc = Single Crochet Increase
dec = Single Crochet Decrease
sl = slip stitch (this is the stitch I use to finish off)
(#) = Number of stitches in the row

I used Fair Isle Liberty yarn in Cloud and Black for the body and in Geranium for her hair. Button eyes, tulle and satin ribbon made the dress. Instructions will follow patterns.

Arms (make 2)
I used Cloud (off-white) yarn.
Stuff every 4 or 5 rows as you go, stuff the hand more firmly and then more loosely through the arm
Round 1: 6 sc in m/c and pull tight, tie off after Round 2 (6)
Round 2: 2 sc + inc, repeat 2 times (8)
Round 3: 3 sc + inc, repeat 2 times (10)
Rounds 4-5: sc around (10)
Round 6: 3 sc + dec, repeat 2 times (8)
Rounds 7-30: sc around and f/o on final Round leaving long tail for sewing (8)
flatten arm and sew two sides together - do not cut yarn, you need it for attaching to the body
Legs (make 2)
I used Black to start the shoes and then after the first time I changed to white I worked 2 rows in each color before switching and left the working yarn uncut between color changes (just pull it up behind on the inside of the leg as you go)
Stuff every 4 or 5 rows as you go, stuff foot and "shoe" firmly and more loosely through the leg
Round 1: 6 sc in m/c and pull tight, tie off after Round 2 (6)
Round 2: inc in each stitch around (12)
Round 3: sc + inc, repeat around (18)
Round 4: 2 sc + inc, repeat around (24)
Round 5: sc BLO around (24)
Rounds 6-7: sc around (24)
Round 8: Change Color every 2 rows, carrying yarn up between color changes 2 sc + dec, repeat around (18)
Round 9: sc + dec, repeat around (12)
Round 10: Change Color sc, dec, 9 sc (11)
Round 11: sc, dec, 7 sc (10)
Rounds 12-30: Change Color sc around (10)
from here on out Change Color every 2 rows, continuing to carry yarn up between color changes
f/o after final Round leaving long tail for sewing
flatten leg and sew two sides together - do not cut yarn, you need it for attaching to the body
Sleeve Caps (make 2)
I used Black yarn
Leave a long tail at the start and at the finish for attaching to body
Round 1: ch 9 and work your way back along the stitches in sc, ch 1 and turn (8)
Round 2: 2 sc, inc, 2 sc, inc, 2 sc, ch 1 and turn (10)
Round 3: sc across, ch 1 and turn
Round 4: ch 1, sc and then ch 1 in each stitch across to the last stitch where you f/o and leave a long tail
Head and Body
Round 1: 6 sc in m/c and pull tight. Tie in after Round 2. (6)
Round 2: inc in each around (12)
Round 3: sc + inc around (18)
Round 4: 2 sc + inc around (24)
Round 5: 3 sc + inc around (30)
Round 6: 4 sc + inc around (36)
Round 7: 5 sc + inc around (42)
Rounds 8-12: sc around (42)
Round 13: 5 sc + dec around (36)
Round 14: 4 sc + dec around (30)
Rounds 15-16: sc around (30)
Round 17: 3 sc + dec around (24)
Begin stuffing head firmly, its about to get hard to do.
Round 18: 2 sc + dec around (18)
Round 19: sc + dec around (12)
Add a little more stuffing to head, from here on out its almost impossible without a tool.
Round 20: dec around (6)
Round 21: sc around (6)
Round 22: inc around (12)
Round 23: Change Color. sc + inc around (18)
Round 24: 2 sc + inc around (24)
Rounds 25-31: sc around (24)
Add stuffing to neck and up into head as much as possible to firm up the shoulders and neck.
Round 32: 3 sc + inc around (30)
Rounds 33-35: sc around (30)
Round 36: 4 sc + inc around (36)
Rounds 37-38: sc around (36)
Round 39: BLO 4 sc + dec around (30)
Round 40: 3 sc + dec around (24)
Stuff body fairly firmly here... you can squeeze a little more in later, but this is the best time. Also, reinforce the fold of your BLO row by holding it as you stuff up to it from inside the doll, trying to keep her bum flat but not concave.
Round 41: 2 sc + dec around (18)
Round 42: sc + dec around (12)
Round 43: dec in all around (6)
f/o and use tail to sew bottom closed - feed into body and cut to hide string
Assembly
Begin by choosing your front and back... all of our increases and decreases have moved the color jogs around the body. Choose the best spots. I hide the color change between neck and body under one of the arms.
Arms
Attach at the line of the shoulder where the color changed.
Sleeve Caps
Attach at the tops of the arms and stitch down the sides of the rows into the body under the arm at front and back, knot in a stitch and hide ends by stitching into body and cutting the yarn ends.
Legs
Attach to the front of the body in the stitches between rows 41 and 42. Knot and hide ends in body.


I used all Cloud for the body and arms and legs and Black for the embellishment.
Arms (make 2)
Round 1: sc 4 in m/c and pull tight (4)
Rounds 2-4: sc around (4)
f/o and leave long tail for sewing to body - don't bother to flatten
Legs (make 2)
Round 1: sc 6 in m/c and pull tight (6)
Rounds 2-4: sc around (6)
f/o and leave long tail for sewing to body - don't bother to flatten
Head and Body (I barely stuff this, but I do add a little stuffing as I work along)
Round 1: 6 sc in m/c and tighten - sew in after Round 2 (6)
Round 2: inc in each stitch around (12)
Round 3: sc + inc, repeat around (18)
Rounds 4-6: sc around (18)
Round 7: sc, dec and repeat around (12)
Add any stuffing you were going to add to head now.
Round 8: dec around (6)
Round 9: sc around (6)
Round 10: 2 sc + inc, repeat x2 (8)
Round 11: sc, inc x4 (12)
Round 12: sc around (12)
Round 13: sc + inc around (18)
Rounds 14-15: sc around (18)
Round 16: sc + dec around (12)
Add any stuffing you were going to add to body now.
Round 17: sc around (12)
Round 18: dec around (6)
f/o and sew closed, hide yarn end in body
Assembly and "embellishment"
Sew arms at the bottom of the row where neck joins body. Hide yarn ends in body.
Sew legs at the bottom using the Round 18 dec to mark the middle alignment. Hide yarn ends in body.
I cut shorter lengths of yarn and stitched them into the top ring of the head and knotted them around then used a comb to separate the strands and make them fluffy, then trimmed to shape with scissors.

What You'll Need (if you're doing what I did)
A regular hair comb
16-20" of ribbon
Black tulle, 3" wide
2 black buttons 3/4" diameter
q-tips
black ink pad or eye shadow
worsted weight yarn for hair
darning or yarn needle
scissors
This is where you really give this gal some personality. Is she a Raggedy Ann doll with pretty red curls? Is she a punky Raggedy Ann with messier curly red pig tails or wild fluffy untamed hair? Is she full on goth or spooky or just cute and sweet?


23 pieces of yarn in that little square... so you know... :D

and it's worth it... :D all those pretty fluffy curls!


Comments
Post a Comment